Pitching is the heartbeat of baseball — every play begins with the ball in the pitcher’s hand. Whether you’re a beginner learning the basics or an experienced player refining your delivery, understanding how to pitch a baseball is essential to mastering the game. Great pitchers don’t just throw hard — they combine control, timing, and strategy to outsmart hitters. You’ll get the confidence to take charge of the mound like a pro as you learn how to pitch a baseball step by step.
Understanding Baseball Pitching
Pitching is at the heart of baseball and really sets the pace of the game. I like to think of each pitch as a strategic chess move – you’re constantly deciding how to outwit the batter. Every pitch has a purpose: a blazing fastball to overpower, a curveball to fool the eyes, a changeup to ruin timing. Good pitching not only keeps hitters off-balance but even directs how the defense positions itself. “The reason you win or lose is darn near always the same – pitching,” as renowned manager Earl Weaver. In other words, mastering your pitches can change the entire flow of the game.
Whether you’re playing in Little League or aiming for the pros, the goal is the same: control the strike zone and put batters in tough counts. Pitching isn’t just brute strength; it’s a mix of technique, strategy, and confidence. I always remind my students that understanding the game situation (like a coach calling pitches) is as important as grip and arm motion on the mound.
Types of Baseball Pitches
There are a few basic pitch types every pitcher should know.
Fastball
The workhorse pitch, thrown at full speed. In the MLB, the average four-seam fastball is about 94 mph. Think of the fastball as your power pitch – straight and fast to challenge hitters. There are variants (4-seam for backspin, 2-seam/sinker for some movement), but all rely on high velocity.
Changeup
This is a deceptive pitch. You use the same arm motion as a fastball, but you hold the ball deeper in your hand so it comes in 10–15 mph slower. It “feels” like a fastball out of the hand but then arrives much slower, throwing off the hitter’s timing. In effect, the changeup is a bait-and-switch to disrupt a hitter expecting heat.
Curveball
A classic breaking pitch that drops sharply as it approaches the plate. Curveballs are much slower (often 70–80 mph) and break downward with heavy topspin. It’s like yanking the carpet out from under the batter at the last moment. When thrown well, a curve can look like a low fastball out of the hand and then dive for the corner.
Slider
A breaking pitch between a fastball and a curve. Sliders are thrown faster than a curve (around 80–85 mph) and break more to the side with a late sweep. You might think of it as a fastball that “cuts” or slides away from the batter. It’s effective for same-handed matchups and as a finishing pitch when you’re ahead in the count.
Each pitch should feel different in your hand (different grip, finger pressure). For example, gripping the changeup deeper feels odd at first, but it’s worth practicing so you can consistently fool batters. I often tell beginners to nail down the fastball first – it’s the “bread and butter” of pitching – and then work on off-speed pitches one at a time.
Pitching Mechanics
Solid mechanics are the foundation of any pitch. Think of it like a chain reaction: every part of your body contributes to the throw. Key elements to focus on are:
Stance & Balance
Start with a stable, athletic stance. Feet should be about shoulder-width apart and pointed toward home plate. A good analogy is that your stance is the foundation of a pyramid – if it’s shaky, the whole pitch falls apart. Stay balanced, with knees slightly bent, so you can generate power without losing control.
Grip
How you hold the ball directly affects its movement. For a four-seam fastball, for example, place your index and middle finger across the seams and the thumb underneath. I always tell pitchers to find a comfortable grip (without squeezing too hard) so the ball isn’t flying out of your hand too early. The right grip is like tuning an instrument – it must be precise.
Windup & Leg Drive
As you begin your motion, shift your weight onto the back leg. A powerful leg drive is like loading a spring – it will launch your body forward. In my experience, the strongest pitchers are those who drive hard off the rubber with their back leg and explode toward home plate. Whether you use the full windup or come set in the stretch, make sure your body stays compact and your hands and arms stay aligned.
Stride
As you stride toward the plate, imagine yourself pushing off a springboard. The stride transfers energy from your legs into your arm and torso. Your front foot should land roughly pointing at the catcher to keep the energy straight toward the plate. Overstriding (taking too long a step) can throw you off balance, so aim for a stride about the length of your height.
Arm Action & Timing
Your arm should swing up smoothly, led by your elbow, with your hand staying “cocked” behind the ball. Timing is crucial: your arm should start forward just as your front foot plants. If your timing is off (e.g. your arm lags behind), you’ll sacrifice velocity and control. Think of it as a well-timed dance move – all parts (shoulder, elbow, wrist) must coordinate.
Release Point
This is where your hand lets go of the ball. A consistent release point (for a fastball, usually when your hand is just above your head) helps with repeatability and accuracy. Picture yourself “popping” the ball out at the same place every time – it’s like having a fixed launchpad. Minor changes in release (early or late) can cause the ball to sail or sink, so drill this in practice.
Follow-Through
After you throw, let your arm continue its natural motion down and across your body. Your back leg should follow (often kicking out behind you) to maintain balance. A full follow-through is like finishing the swing in golf – it ensures maximum energy transfer and protects your arm. I always say: finish like you’re throwing your glove to first base. It not only helps with velocity but also reduces stress on your shoulder and elbow.
Getting each of these pieces right takes practice. In fact, I remind newcomers that pitching mechanics are like building a sturdy tower – missing one block (like grip or balance) weakens the whole structure. Reviewing videos of your delivery or working with a coach can help catch small flaws before they become bad habits.
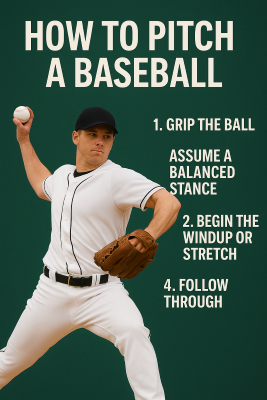
Step-by-Step Guide: How to Pitch a Baseball
To tie it all together, here’s a concise step-by-step routine I walk every pitcher through:
Grip the Ball
Choose the grip for the pitch you want. For a basic four-seam fastball, place your index and middle fingers across the seams with the thumb underneath. Hold the ball lightly – tight fingers can make pitches wild. The way you grip the ball literally changes its path.
Assume a Balanced Stance
Step onto the pitching rubber and stand relaxed with feet shoulder-width apart. I coach pitchers to bend their knees slightly and lean forward a bit, keeping the center of gravity low. This athletic posture (feet pointed toward home) is the setup for a controlled throw.
Begin the Windup or Stretch
- Windup: With runners off or when you have a comfortable setup, pivot slightly away from the plate and bring your hands together at chest level. Shift your weight onto your back leg – you’re essentially winding up like a coiled spring.
- Stretch (Set): If you’re pitching with runners on base, use the quicker stretch position. From your stance, bring your hands together just below the chin, ready to lift the leg.
Leg Lift
Raise your front leg in a controlled motion, knee coming up toward your belt. I encourage pitchers to lift to a consistent height (about waist level) to build momentum. This leg lift is like taking a deep breath – it readies your body to explode forward. Keep your eye on the catcher’s target as you lift.
Stride Toward Home Plate
As your front leg drops from the lift, push off forcefully with your back leg and take a long, straight stride toward the plate. This should be a smooth, athletic motion – not a jump or stumble. Imagine driving your hips and front foot toward the target; this leg drive will channel power up through your body.
Arm Motion
While you stride, your throwing arm whips into action. Your elbow comes up, and your hand trails behind the ball. I tell pitchers to picture their arm as a whip: it should snap through the ball just as your front foot lands. Ensure your arm follows the body’s rotation so that your hand stays behind the ball through the throw.
Release the Ball
At the exact point when your arm reaches full extension (usually when your hand is around head level), let the ball go. The release should feel like a quick flick from your wrist. Consistency here is key: try to let go from the same spot every pitch. A useful tip is to aim to “throw through” the catcher – imagine handing the ball to him – so you don’t hold onto it too long or push it early.
Follow Through
Right after release, continue the motion. Let your throwing arm swing down and across your body naturally. Your back leg should follow, finishing off balance as your belly faces the batter. This complete follow-through not only adds power but also stops your arm safe and sound. Think: “finish big,” so you’re ready in case the ball is hit back at you.
Finish Balanced
By the end of your throw, you should land in a balanced, athletic pose. If everything’s correct, you’ll be off the mound in an active stance, eyes on the batter. Ending balanced means you can quickly field the ball or make the next move. If you end wildly off-balance, it’s a clue your mechanics went awry somewhere.
Following these steps consistently creates muscle memory. In fact, I often say, “Repeat it until it feels wrong not to.” It might feel awkward at first, but repetition makes it second nature. Always practice these steps slowly at first – you can speed up once the form is right.
Baseball Pitching Tips
Beyond the basics, here are some tips that I’ve found separate average pitchers from great ones:
Practice Consistently
Nothing beats repetition. Make time for regular bullpen sessions, even if it’s just 20-30 minutes. Consistent practice engrains good habits and builds muscle memory. For example, doing a few warm-up throws every day is better than cramming all your throwing into one day.
Emphasize Control Over Raw Speed
Many players focus on throwing as hard as possible, but accuracy wins games. I remind pitchers that a perfectly located 80-mph fastball is more deadly than a 95-mph meatball down the middle. Work on hitting specific spots in the strike zone consistently before trying to add more velocity.
Establish a Pre-Pitch Routine
A consistent routine helps you stay calm and focused on the mound. Before each pitch, you might tap your foot a certain number of times, take a deep breath, or wipe your hands. This signals your brain to reset and approach each pitch fresh. In high-pressure moments, a routine is like your anchor. I’ve seen young pitchers get into trouble when they hurried their prep; taking an extra second can make a big difference.
Strengthen Your Lower Body
Remember that much of pitching power comes from your legs and core. Incorporate squats, lunges, and core exercises into your workouts. I compare this to pushing a car: if your legs (the car) are weak, no matter how hard you push with your arms, you won’t go far. Strong legs lead to a stronger stride and more velocity.
Mix Up Pitches and Locations
Keep batters guessing. If you only throw fastballs, hitters will tee off. I practice throwing to all parts of the zone, not just the middle. Work on combinations – e.g., high fastball followed by a low changeup – to prevent hitters from getting comfortable. As one coach said, “to really attack hitters, you must keep them off balance” by varying speed and location.
Stay Mentally Tough
Every pitcher has good innings and bad innings. Learn to shake off a bad pitch quickly. In fact, Hall-of-Famer Ferguson Jenkins said, “Mental attitude and concentration are the keys to pitching”. Keep a short memory: after each pitch, look for the next one. I practice visualization and deep breathing to maintain focus in crucial moments.
Watch and Learn from Others
Study professional pitchers on TV or online. Observe their mechanics, grips, and mound presence. I often tell my players to watch how MLB pitchers handle tough counts. You can pick up grips, stance tweaks, and even pitch sequence strategies by studying pros.
Take Care of Your Arm
Finally, arm care is non-negotiable. Always do a proper warm-up (light throwing, arm circles) before pitching, and cool down after. I recommend post-pitching routines like icing or long-toss rehabilitation work. Neglecting arm care is a big mistake; consistent stretching and strength work for the shoulder and elbow will pay dividends in staying healthy.
Most importantly, patience and hard work pay off. I often quote the saying: “You cannot rush something that you want to last forever.” Solid pitching takes time to develop, so stick with it and trust the process.
Drills to Improve Your Pitching Skills
Drills are practice in action – each one targets a specific part of your delivery. Here are a few favorites I use with players:
Towel Drill
Wrap a small towel around your thumb and index finger and go through your pitching motion as if throwing a ball. This reinforces a full extension and follow-through without the weight of a ball. I like this drill for arm speed – when you “snap” the towel, you feel how your arm should whip through the release point.
Wall Drill
Stand a step or two away from a wall and pitch (toss a hand motion) without hitting it. This forces you to stay straight and not lean or fall away. It’s great for balance and alignment, as it encourages your body to move in a straight line toward home. If you start drifting or spinning, you’ll bump the wall – so it teaches you to keep your delivery compact.
2-Ball Curveball Drill
Grab two balls in one hand and simulate a curveball pitch. This overemphasizes the wrist snap and spin. When you can throw two balls together successfully, you feel the proper grip and release needed for an effective curve. This drill is like a “curveball masterclass” – it instantly tells you if your fingers are snapping through correctly.
Bucket Drill
Sit on a sturdy bucket and get into your pitching position (still with your glove hand holding a ball). Rise up off the bucket using your legs and finish the pitch. This makes you drive with your legs and prevents you from throwing from your shoulders. I use this to strengthen leg drive and enforce that upward push from the rubber.
Figure-Eight Drill
Just before you throw, swing your throwing arm in a figure-eight motion in the air. This loosens up the shoulder and grooves a smooth, rhythmic arm path. It’s like a warm-up for the arm that blends shoulder rotation with timing. Many pros use this to dial in their mechanics before firing a real pitch.
Throwing into a Net/Target
Even simple drills count. Repeatedly throwing strikes (or hitting spots) into a net or at a catcher’s glove can improve muscle memory. The Net Drill (short toss into a net) is great for focusing purely on accuracy. I have pitchers practice moving targets or hit the corners with no pressure – it builds confidence and control.
In practice, I mix these drills into our warm-up routine. Drills are like practice tools in a musician’s kit – use different drills to fine-tune specific parts of your delivery. And remember, start drills slowly and focus on form; gradually pick up speed as you feel comfortable.
Common Mistakes and How to Avoid Them
Even experienced pitchers fall into these traps, so be aware of them:
Poor Grip or Posture
Gripping the ball incorrectly or slouching in your stance kills control. I’ve seen beginners squeeze too hard or let the ball sit crooked in their fingers. Double-check your grip each time. Also, standing upright (not hunched) and balanced is crucial – think of a sprinter’s ready position. Fixing grip and posture can cure a ton of wild pitches.
Inconsistent Delivery
Changing your mechanics from pitch to pitch is a recipe for chaos. If your arm, head, or feet are in different positions each time, your pitches will wander. Break down your throw in slow motion and practice it in segments until it’s repeatable. Consistency is the name of the game – I tell pitchers to “throw the same pitch with the same motion” every single time.
Overstriding
Taking too big a step toward the plate (overstriding) can throw off your balance. It’s tempting to lunge forward, but this often results in falling off to one side and losing power. Aim for a stride roughly equal to your height and land firmly. A good check is to watch where your front foot lands – it should not be way out front, but under you or slightly ahead.
Cutting Off Follow-Through
Stopping your arm short after releasing the ball can cost velocity and cause arm strain. Sometimes, pitchers get anxious and “stop” at the release point. I always emphasize “finish your throw” – after you let go, let your arm swing naturally. Skipping this is like braking mid-throw, and it’s hard on the shoulder.
Neglecting Arm Care
This includes skipping warm-ups, ignoring pitch counts, or not stretching. Forgetting a proper warm-up is like trying to run a marathon in flip-flops – you’re asking for trouble. Always loosen up with easy tosses first, and listen to your body. If your arm starts to ache, take a break. Proper cooldown (light throwing or stretches) is also important.
Losing Focus
This one sneaks up on everyone. A distracted pitcher makes wild throws. Developing a routine between pitches helps keep your head in the game. Remember Ferguson Jenkins’s wisdom: “Mental attitude and concentration are the keys to pitching”. Stay present, pitch by pitch, and don’t let one mistake snowball into another.
Each of these mistakes has a simple fix: focus on fundamentals and be mindful. In my coaching, I often see improvements just by reminding a player to relax their grip, square their shoulders, or exhale right after each pitch.
FAQ
How do I teach a kid to pitch a baseball?
For kids (ages 8-10), start very basic: teach the grip and stance first, and use a short distance. Break the motion into easy steps (for example, first master the balance and arm motion before adding a full stride). Emphasize fun and safety – make drills games so they learn without feeling pressured. Most experts suggest starting around 8-10 years old, focusing on form rather than power. A good approach is to let them throw from a closer mound with lighter balls and celebrate small successes.
How can I improve my pitching speed/velocity?
Increasing velocity generally means strengthening your legs and core, and refining your mechanics. Work on explosive leg exercises (squats, lunges, plyometrics) since your power comes from the ground up. Also, focus on your delivery timing (hips, shoulders, arm) to make sure you’re transferring energy efficiently. Long-toss drills and weighted-ball programs (under supervision) are common tools, but the basics (strong legs + good mechanics) are key. Remember, as Coach Greg Maddux said, it’s also about location – a well-placed 85-mph fastball beats a 95-mph ball you can’t control.
How do I avoid pitching injuries?
Injury prevention starts with proper mechanics and care. Always warm up your arm before intense throwing, and never ignore soreness. Use a correct motion (no twisting your wrist weirdly), and stick to recommended pitch/inning counts to avoid overuse. A solid warm-up (light throws, stretching) and cool-down (light throws or band work) around each session is important. Strength and flexibility training (especially for shoulders and elbows) also helps keep you healthy. In short, pitch smart and listen to your body.
What drills can improve pitching accuracy?
Focus drills help a lot. For example, try the Towel Drill (using a towel as if it were a ball) to rehearse your arm motion, or throw into a net/target at short distance to work on hitting spots. The Figure-Eight Drill (swinging your arm in a figure-8 before each pitch) smooths out your arm path. Even simple bullpens aiming at corners will improve consistency. The key is repetition: the more you hit the target during practice (even at half speed), the more muscle memory you build for games.